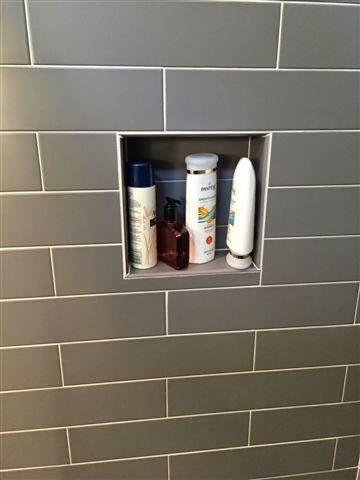
Customer sent completed photos of the Sun City Center, Florida bathroom shower project. Grey 12x24's vertical brick joint on shower walls with vertical glass accent band. Octagon "Urban Tapestry" shower floor tile #tile #shower #bathroom #completed #suncitycenter #tampa #ceramictec
Showing posts with label bathroom. Show all posts
Monday, June 12, 2017
Monday, June 5, 2017
Saturday, March 18, 2017
An “A” Angie’s List Review from a Land O Lakes, Florida tile customer!
Overall A
Price A
Quality A
Responsiveness A
Punctuality A
Professionalism A
Description Of Work: Rebuilt and tiled our partially demo’ed master shower and tiled tub surround
Member Comments: Brian was extremely professional and great at communicating prior to starting the work (such as when a total newbie to this sort of thing – meaning me- needed help clarifying the materials to pick out for work to start) as well as during the work phase. He kept us apprised of the status of the work the entire time. And the quality of work is great. We feel very relieved that we were able to find his services through Angie’s List and honest reviews. We plan to hire him for work in the future.
Overall A
Price A
Quality A
Responsiveness A
Punctuality A
Professionalism A
Description Of Work: Rebuilt and tiled our partially demo’ed master shower and tiled tub surround
Member Comments: Brian was extremely professional and great at communicating prior to starting the work (such as when a total newbie to this sort of thing – meaning me- needed help clarifying the materials to pick out for work to start) as well as during the work phase. He kept us apprised of the status of the work the entire time. And the quality of work is great. We feel very relieved that we were able to find his services through Angie’s List and honest reviews. We plan to hire him for work in the future.
Labels:
Angies List,
bathroom,
land o lakes,
price,
professionalism,
puntuality,
quality,
responsivness,
reviews,
Shower,
Tampa,
tile,
tub
Monday, February 20, 2017
Tub Conversion Into Stand Up Tile Shower in Wesley Chapel, Florida
Before & After photo of a tub conversion into a stand up shower in Wesley Chapel, Florida. 4x8 white subway tile on shower walls, 2x2 mosaic shower floor with a 12x12 diagonal porcelain tile on main floor #tile #beforeandafter #shower #bathroom #subway #wesleychapel #ceramictec
Labels:
bathroom,
beforeandafter,
ceramictec,
Shower,
subway,
tile,
wesleychapel
Friday, August 12, 2016
Before & After Tampa, Florida condo tile shower
Before & After photo of a hall bathroom 12x24 tile shower we did in a condo in Tampa, Florida #tile #beforeandafter #shower #tampa #ceramictec
Labels:
bathroom,
before and after,
ceramictec,
condo,
Shower,
Tampa,
tile
Wednesday, August 10, 2016
Low Curb Tile Shower Sun City/Tampa, Florida
Customer sent over photos of the finished low curb shower & bathroom in Sun City Center, Florida #tile #lowcurb #shower #bathroom #suncitycenter #tampa #ceramictec
Saturday, August 6, 2016
Before & After 12x12 diagonal bathroom floor South Tampa, Florida
Before & After photo of the Marmol "Venatino" Honed 12x12 diagonal bathroom floor in South Tampa, Florida #tile #beforeandafter #bathroom #floor #12x12 #diagonal #southtampa #ceramictec
Labels:
bathroom,
ceramictec,
diagonal,
floor,
south tampa,
tile
Friday, August 5, 2016
South Tampa, Florida Honed 3x6 Subway Shower & Bathroom
Completed photos of the South Tampa, Florida bathroom & shower project. Marmol "Venatino" Honed 3x6 subway tile walls, 2x2 shower floor and 12x12 diagonal main floor, Schluter Kerdi waterproofing #tile #shower #3x6 #subway #southtampa #ceramictec
Labels:
3 x 6,
bathroom,
ceramictec,
Marble,
Shower,
south tampa,
subway,
tile
Tuesday, June 14, 2016
Temple Terrace, Florida master bathroom shower project
Completed the Temple Terrace, Florida shower project. 4x12 off-white subway tile on walls. Pinwheel slate mosaic on shower floor with a matching niche #tile #shower #subway #templeterrace #ceramictec
Labels:
bathroom,
ceramictec,
mosaic,
pinwheel,
Shower,
subway,
Temple Terrace,
tile
Saturday, March 14, 2015
South Tampa, Florida 12x24 porcelain tile small bathroom floor
Finished the small bath in South Tampa, Florida installing a Style Selections "Mitte White" 12x24 porcelain tile #tile #tampa #bathroom #12x24 #porcelain #urethane #grout
Wednesday, January 14, 2015
New Tampa, Florida master bathroom tile renovation
Final photos from the New Tampa, Florida master bathroom shower, garden
tub & floor tile renovation. Tile was American Olean "Costa Rei" Oro
Miele 10x14 on shower walls (brick set w/Dark Emperador marble accent
band tub face & shower), 2x2 shower floor & 18x18 main room
floor #tile #americanolean #laticrete #renovation #shower #bathroom #newtampa #tampa #ceramictec
Labels:
bathroom,
ceramictec,
installation,
New Tampa,
renovation,
Shower,
Tampa,
tile,
tub
Tuesday, January 6, 2015
South Tampa, Florida guest bathroom tile installation
Labels:
bathroom,
ceramictec,
installation,
Shower,
south tampa,
Tampa,
tile
Saturday, April 24, 2010
Ceramic Tile Shower – Tampa, Florida
Rip Out, Prep, Waterproofing, Install Tile:
We completed a hall bath shower rip out & replace in Tampa for a Architect we know. This is his personal home and is Florida and is about 30 years old. The shower pan was done incorrectly and it didn’t have a pre-slope under the liner, had a drain directly connected to the drain pipe and was nailed at the bottom through the liner to the studs. Whoever built this shower pan had no idea on how to build a properly waterproofed traditional pre slope pan & liner. Where would the water go that saturates the mud bed without having weep holes? Something us professionals don’t like seeing.
Being a Tile Contractor in Tampa there was something else I didn’t like seeing, it was the way they did a fake wall mud tile job look. They pretty much put cement board over top drywall and used mastic with 4×4 wall tile and a mud cap A-4200. It gives the look of a built out mud wall but not an actual good way of doing it. Mastic is NEVER good in a shower or wet area and can re-emulsify when wet over time. We demoed the whole old shower area, removing the wall tile, cementboard, old drywall, shower floor tile, mud bed, liner & drain.
We then installed the new cement board, mesh taped the joints and used thinset over them. Installed a new Ebbe drain riser and drain and a new mud bed using Laticrete 3701 fortified mortar bed. The 3701 is a thick-bed mortar that is exceptionally strong and resistant to weather, frost, thermal and physical shock, pre blended and perfect for a job like this. After the cement board and mesh tape was up and the Mud bed cured we used HydroBan liquid waterproofing on the shower pan and up the walls and over the shower curb. We used the divot method to tie the waterproofing into the clamping ring drain, and the filled the divot, packed with pea gravel, mud and more HydroBan over it.
Once the HydroBan was dry we then laid out our wall tile to achieve the best full size cuts in the corners. The tile we were using picked out by the Homeowner was a Floor Gres 4×4 Ceramic White tile with scalloped edges. He also selected Spanish style red rectified porcelain 16×16 tile to go on the bath floor from a local tile showroom. We also cut the 16×16 floor tile down to match the size of the Ebbe drain grate.
The installation went great since our wall and floor prep was done correctly. The scalloped edged tile were hard to put up since the varying sized grout joints could not take a spacer, so for that we used an non sag mortar from Laticrete called MultiMax 255 which held the tile in place and didn’t allow them to slide, better then using a ledger board and spacers. We then set the rectified floor tile with 3/16″ grout joints per the owners request. He purchased a matching red grout for the main floor and the shower floor and a bright white sanded grout for the wall tile, both grouts were Pro Spec 700 sanded grout.
Grouting went easy and we cleaned up and final washed the tile and turned it over to the homeowner. He was very pleased with how it came out and could not believe the before and after look of his bathroom. The owner was going to install a hard Ipe wood for his curb. I usually suggest a marble sill or tile on the curb, but seeing how the dense cell structure of IPÊ (all heart wood) is not only naturally resistant to insects but also to decay, rot, molds and weather has little to no effect upon the structural integrity of IPÊ wood, it would do good as a shower curb sill. He was also going to urethane seal it and I suggested to him to attach it with either an epoxy or a polyurethane construction adhesive like Liquid Nail or PL Premium.
below are some pictures taken during to project, I hope you enjoy them.
We completed a hall bath shower rip out & replace in Tampa for a Architect we know. This is his personal home and is Florida and is about 30 years old. The shower pan was done incorrectly and it didn’t have a pre-slope under the liner, had a drain directly connected to the drain pipe and was nailed at the bottom through the liner to the studs. Whoever built this shower pan had no idea on how to build a properly waterproofed traditional pre slope pan & liner. Where would the water go that saturates the mud bed without having weep holes? Something us professionals don’t like seeing.
Being a Tile Contractor in Tampa there was something else I didn’t like seeing, it was the way they did a fake wall mud tile job look. They pretty much put cement board over top drywall and used mastic with 4×4 wall tile and a mud cap A-4200. It gives the look of a built out mud wall but not an actual good way of doing it. Mastic is NEVER good in a shower or wet area and can re-emulsify when wet over time. We demoed the whole old shower area, removing the wall tile, cementboard, old drywall, shower floor tile, mud bed, liner & drain.
We then installed the new cement board, mesh taped the joints and used thinset over them. Installed a new Ebbe drain riser and drain and a new mud bed using Laticrete 3701 fortified mortar bed. The 3701 is a thick-bed mortar that is exceptionally strong and resistant to weather, frost, thermal and physical shock, pre blended and perfect for a job like this. After the cement board and mesh tape was up and the Mud bed cured we used HydroBan liquid waterproofing on the shower pan and up the walls and over the shower curb. We used the divot method to tie the waterproofing into the clamping ring drain, and the filled the divot, packed with pea gravel, mud and more HydroBan over it.
Once the HydroBan was dry we then laid out our wall tile to achieve the best full size cuts in the corners. The tile we were using picked out by the Homeowner was a Floor Gres 4×4 Ceramic White tile with scalloped edges. He also selected Spanish style red rectified porcelain 16×16 tile to go on the bath floor from a local tile showroom. We also cut the 16×16 floor tile down to match the size of the Ebbe drain grate.
The installation went great since our wall and floor prep was done correctly. The scalloped edged tile were hard to put up since the varying sized grout joints could not take a spacer, so for that we used an non sag mortar from Laticrete called MultiMax 255 which held the tile in place and didn’t allow them to slide, better then using a ledger board and spacers. We then set the rectified floor tile with 3/16″ grout joints per the owners request. He purchased a matching red grout for the main floor and the shower floor and a bright white sanded grout for the wall tile, both grouts were Pro Spec 700 sanded grout.
Grouting went easy and we cleaned up and final washed the tile and turned it over to the homeowner. He was very pleased with how it came out and could not believe the before and after look of his bathroom. The owner was going to install a hard Ipe wood for his curb. I usually suggest a marble sill or tile on the curb, but seeing how the dense cell structure of IPÊ (all heart wood) is not only naturally resistant to insects but also to decay, rot, molds and weather has little to no effect upon the structural integrity of IPÊ wood, it would do good as a shower curb sill. He was also going to urethane seal it and I suggested to him to attach it with either an epoxy or a polyurethane construction adhesive like Liquid Nail or PL Premium.
below are some pictures taken during to project, I hope you enjoy them.
Labels:
bathroom,
Bradenton,
Brandon,
ceramic,
Florida,
glazed,
gloss,
grout,
Hillsborough,
hydroban,
installation,
installer,
mud,
porcelain,
professional,
Residential,
Shower,
Tampa,
waterproofing
Subscribe to:
Posts (Atom)