Tuesday, February 23, 2010

To DIY Tile or Not to DIY Tile.....

That is the question....

So you’re planning on doing a DIY tile job huh? It’s not for everyone and it sure isn’t for the faint of heart. It’s fun to plan and have a vision of doing your own tile work be it a small foyer, back splash, back patio/lanai or even a shower area. But there’s more to it then just sticking some square tiles on the wall or floor in rows. Here in Florida there is so much tile being installed some of the fly by night installers moonlighting as tile setters aren’t really that good. You can’t do a good, quality tile job in a few weeks of reading, you need to have the years of knowledge that a “Professional” tile setter has. This from being on jobs and seeing installation techniques of various types of tile, or learning from another pro on the job over the years of work.

If you do decide to go at it yourself you will require the proper tools for the job. You will need to go out and purchase a good amount of specialty tools that most tile setter already have and own. Things like a quality wet saw, maybe you can rent one from the local rental store, but will the blade be what you need for the type of tile you are cutting? You will also need to purchase items like trowels, a speed square, chalk line, level, maybe some straight edges, ledger boards, spacers, rubbing stones, nippers, a razor knife, hole saw, mixing drill, mixing paddle, angle grinder, and so on.

Other things you will need to understand are, which trowels to use, what will I use to cut which type of tile, will a bar snap cutter cut porcelain or do I need a wet saw. Can I use an angle grinder on Travertine or do I need a special blade for the wet saw. Then figure out how your floor was constructed and make sure you have the proper deflection for the tile your installing. If you’re on a slab you will need to figure out if your hairline cracks are slab crack or are they control joints. Then you will need to understand if you need a crack membrane on the whole floor or can you get away with just applying it to just bridge the cracks. Maybe an uncoupling membrane would work, how could I lay out this wall or floor to line up the grout joints to look good.

You will also need to understand which type of thinset to use, modified, flexible, un modified, epoxy, rapid setting, gray or white. And then figure out if the type of tile you are setting requires it’s own type of thinset, that and making sure you can use that type of thinset with the type of substrate or other material you are using. Schluter Ditra & Kerdi require a UN modified thinset to set tile, but glass tile manufacturers require you to use a highly modified, ohh no. What next? Granted you could probably read about tile and do some research for a few weeks if you have the time, between working, kids, family, friends and your relaxation time.

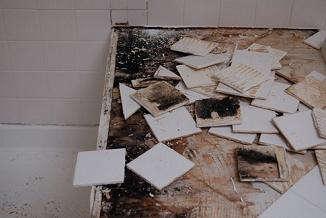
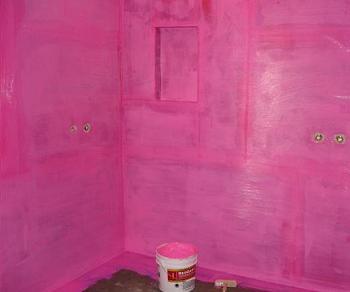
All this and still not breaking the surface of the knowledge you need to achieve a perfect tile installation. If your doing a shower your really in for it. Shower waterproofing is a pretty tricky and difficult installation. Do you need a traditional liner with a pre slope or can you go with a sheet waterproofing membrane like Schluter Ditra or NobleSeal TS. Or will a liquid membrane like Hydroban, Hydro Barrier or RedGard be better for your shower area. This is an area you don’t want to mess up on, a leak in your waterproofing or shower pan liner can seriously cause problems. Water dripping from your kitchen ceiling, damaging your drywall, soaking your carpets, rotting studs in your walls or mold forming behind your shower walls.

Do you want to spend the time, effort and possible the waste of some material for a chance you might have a good tile installation in your home? I myself would not attempt to do electrical and or a big plumbing job in my house. I would rather hire a pro with experience on getting the job done right, on time and at a fair price. I’m not trying to scare you away from doing it, heck, you’re the one that has to live with it and look at it everyday. But I know one thing; tile and most other finish trades require some sort of skill. Can you do it? Sure you can. We all started some place. I have seen a good amount of people come to a popular tile forum I help answering tile related question on looking for advice and tackling the project themselves with success, and there are also the other 80% that come there looking to be bailed out after they botched the tile project they were so excited to “Do It Yourself”.

I know from over 20 years of installing tile like glass, porcelain, travertine, marble, ceramic, paver’s and many more other types of tile here in Tampa, Florida and also prior up in New Jersey that doing a perfect tile project isn’t an easy thing. There is a lot of labor involved along with scheduling, logistics, layout and making everything come together.

My advice to you is either commit yourself to over a month of having your house turned upside down and ripped apart, or doing some research and hiring a professional, skilled, qualified Tile Contractor that is up to date with current installation techniques to do your job. You will spend a little more but you can rest assured after doing your due diligence that you will have a quality, long lasting, good looking and professional tile installation.

Thanks for reading.

Wednesday, February 3, 2010

A Moldy Situation – Info on Mold....


This safety article was sent to me and used with permission from a well respected tile contractor I know. With me being a Tile Contractor in Florida I know how bad mold is from seeing it in so many failed showers we replace here.
This article has good info on it and I think it will help Florida homeowners understand about mold, it’s dangers and the Importance of a Waterproofed Shower.


______________________________________________________________

By Juan F. Garcia
Redrock Tile and Stone
Loa, Utah, USA


Of the many hazards that face us in remodeling projects, none seem to be more misunderstood than properly managing and cleaning up mold. This article will attempt to provide an inclusive source of information on mold, starting from a description of mold, why it is a problem, why it is prevalent in showers, what is the proper way to clean it up, and how to prevent it from coming back.

What is mold?

Mold is usually seen as the blackish green stuff growing in that forgotten container of leftover food in the back of your refrigerator. You know the one, last month’s dinner with the neighbor’s, or the bag of fruit that the kids were supposed to throw away last week. How did it get there? It certainly wasn’t there when you put the food in the refrigerator. Or was it?

Mold is a naturally occurring organism and is an essential part of the decomposition and decay of organic matter. Mold is a member of the fungus family, the same as mushrooms. It thrives primarily in moist and warm environments however can even be found in cooler temperatures, such as your refrigerator. Its tiny spores are ever present in the air and it only takes one spore, with the right conditions to begin to multiply. Once present on organic matter, mold spores, like seeds, begin to germinate and grow. The result is the slimy or fuzzy stuff seen on the surface. It can range in colors from white to beige, brown, and black or colors of red, green and purple.

Why is mold a problem?

Regardless of what you may have been told, mold, in and of its self, is NOT toxic. The “toxic black mold” as seen in the media and regurgitated by some businesses is a way of duping the uneducated public into a panacea. Certain types of mold, however, can produce substances known as mycotoxins, which are toxic. Ingestion, or eating, of mycotoxins is known to cause illness.

Molds have been known to cause some health problems. Allergy like symptoms such as congestion, sneezing, irritated nose, throat, and eyes, and coughing may have be attributed to inhalation and/or ingestion of mold or mold spores. Some individuals, when exposed, show no symptoms at all. Individuals such as young children, the elderly, those already suffering from asthma, and those with suppressed immune systems may be more susceptible to sickness from mold exposure. The exposure limits to mold for certain health effects are not conclusive; hence, it is not specifically regulated under OSHA.

Mold is not only unsightly; it is also a problem in building systems due to its primary purpose, to decompose organic matter. Mold laden building materials such as plywood subfloors and floor/wall framing can deteriorate beyond usability and require replacement. Severely deteriorated building systems can affect the structural integrity of the entire structure. Many times the effects of the deterioration are hidden behind walls or under surface materials and are not discovered until there is a problem.

Why is mold prevalent in showers?

Besides the refrigerator, its next best environment for growth is in a bathroom. What better place to grow than in a warm and moist environment. Perhaps you have seen some mold growing around the bathroom. Maybe somewhere in the far corner, or up on the ceiling where you normally don’t clean. Just as your refrigerator science experiment, mold has gotten in there, uninvited. Could it also be hiding behind your shower walls?

Have you ever calculated how much “rainfall” your shower gets per year? If you take one 12 minute shower per day in a 48 inch x 48 inch shower and your shower head flows at 2.5 gpm (gallons per minute), you have almost 1100 inches of rainfall equivalent per year – in your shower! Rainforests do not get that much water and look at the fungi that grow there. Is your shower designed to withstand that type of water exposure? Unfortunately, many poorly constructed showers are prevalent in homes today.

What is the proper way to clean mold contamination?


Surface molds, as seen in many bathrooms, is easily handled with over-the-counter disinfectants and wiped away during routine cleaning. If your cleaning is not so routine or you have mold problems from a flood or a poorly designed shower then here are some guidelines to follow for proper cleanup. As with all cleanup operations, you need to consider your skills, your liability, and your patience. In some cases, it is advisable to hire a professional contractor who has the experience, training, and equipment to properly clean up the mold.

Assuming you have stopped the cause of the moisture where the mold is growing, the first order of business in mold remediation is wearing proper personal protective equipment. At a minimum you should have an N95 respirator, rubber gloves, and splash proof goggles. Depending on the severity of the mold contamination, a full face air-purifying respirator may be needed, and a full body protective suit can be worn.

Secondly, all remediation should be done using wet methods such as a sponge or mop and a wet/dry HEPA filtered vacuum. The key with these tools is to eliminate getting the mold and mold spores airborne. Obviously, water will be the primary “wet” tool and some type of disinfectant. There a number of commercially available disinfectants on the market but most sources suggest a chlorine bleach solution with a ratio of 1 cup bleach to 1 gallon of water. Water takes the shape of its container so controlling cleanup water may be the next step in the remediation process. Heavy (6 mil) polyethylene plastic sheeting properly taped to floors, walls, and ceiling is one way to contain the overflow of contaminated water and cleanup solution.

Another recommendation in mold remediation is creating a containment barrier, usually of heavy (6 mil) polyethylene plastic sheeting that isolates the contaminated area from the rest of the dwelling. This setup may require airlock type chambers and negative air filtration units. If the mold is so severe or widespread that this type of containment system is needed, it’s probably time to hire a professional.

Lastly, if the mold cannot be adequately cleaned up or the building material is beyond salvaging, it is best to remove the building material and rebuild with new material. Any material that is severely contaminated with mold should be carefully handled, wrapped in plastic sheeting or heavy garbage bags to avoid spreading contamination, and properly disposed of.

How do you prevent mold from coming back?

Now that you are educated and have properly handled your mold problem, the final step is to prevent mold from growing again. If your dwelling has required some type remodel, now is the time to rebuild using industry specific techniques and modern materials available to you. A properly constructed shower that utilizes surface applied moisture barriers is becoming the widely accepted method for controlling moisture at the surface and eliminating the buildup of moisture in hidden areas.

Since mold is ever present in our environments, the best solution is to reduce the moisture on the building material where it likes to grow. Next to proper construction, here are some steps that will prevent any future mold problems.

1. Wipe or squeegee water from surfaces.
2. Install a fan or dehumidifier in location where moisture is present.
3. Weekly cleaning of surfaces with a disinfectant.
4. Monthly checking of surfaces for cracks, chips, or gaps where water may collect.
5. Fix any problems on those surfaces or where discoloration beneath surfaces is seen.


References:

http://www.cdc.gov/mold/strats_fungal_growth.htm

http://en.wikipedia.org/wiki/Mold_growth,_assessment,_and_remediation

http://www.aiha.org/news-pubs/newsroom/Documents/Facts%20about%20Mold.pdf

http://www.epa.gov/mold/mold_remediation.html

http://www.epa.gov/mold/moldguide.html

http://www.osha.gov/SLTC/molds/

http://www.nap.edu/openbook.php?isbn=0309091934

Disclaimer: The purpose of this article is to provide the reader with a basic understanding of health and safety issues related to the topic. The reader assumes full responsibility for their own actions and will not hold the author liable or responsible for the accuracy, completeness, or usefulness of any information, product or process disclosed in this article or for any injury or illness to themselves or others arising from information derived from this article.
.
.

Monday, January 25, 2010

Commonly used Tile in Florida Definition….

to view our current blogs go to our website or read the original here.
http://ceramictec.com/commonly-used-tile-in-florida-definition


At Ceramictec we install the finest selection of name brand tile with the widest selection of patterns, textures, sizes and colors. No matter what your decor or color scheme we can help you find the perfect tile for your home decorating.

* Stain Resistant
* Scratch Resistant
* Fire Resistant
* Doesn’t Fade from Sun Light
* Easy to Clean


Porcelain Tile — Is a tile that is generally made by the dust pressed method from porcelain clays which result in a tile that is dense, impervious, fine grained and smooth, with a sharply formed face. Porcelain tiles usually have a much lower water absorption rate (less than 0.5%) than non-porcelain tiles making them frost resistant or frost-proof. Glazed porcelain tiles are much harder and more wear and damage resistant than non-porcelain ceramic tiles, making them suitable for any application from light traffic to the heaviest residential and light commercial traffic. Full body/though body porcelain tiles carry the color and pattern through the entire thickness of the tile making them virtually impervious to wear and are suitable for any application from residential to the highest traffic commercial or industrial applications. Porcelain tiles are available in matte, unglazed or a high polished finish.

Glazed Tile — Most of the common ceramic floor tiles have either a glazed, or unglazed surface. The glazed tiles have a special ceramic coating that is applied to the body of the tile and then fired under high heat. The glazing becomes hard.

Unglazed Floor Tile — There is no glazing or any other coating applied to these tiles. Because these tiles are porous it is recommended that a special penetrating sealant be used to maintain this type of floors and to help prevent stains from seeping into the pores of the tiles. Their color is the same on the face of the tile as it is on the back resulting in very durable tiles that do not show the effects of heavy traffic.

Marble — Marble is a natural product and is not made in a factory. For this reason no two pieces of marble look the same and the veining is a natural characteristic in all marble. One of the more popular marble tile in Florida is Travertine. There are special marble sealants to help protect from staining of the face. Extra care should be used when cleaning and all abrasives and acidic cleaners should never be used when cleaning. Even colas, some juices, and possibly ammonia may destroy the marble finish.

Granite — This is another natural stone and is not manufactured in a factory. Granite can be used indoors or outdoors and is less porous than marble. It is still recommended that you use a sealant to protect the finish from staining.

Grout — Grout is a mixture of cement and a color additive. For tile floors with wider spaces between each tile sand is added to the grout. Also, a liquid latex additive can be added to the grout to give better resiliency to the grouted areas. For ease of maintenance a penetrating sealant should be used on the grout. It should be noted you may see a change in color of your grout over time. To stop this we highly recommend an upgrade to an epoxy grout.

Some of the other important things we can help with when selecting a tile floor is the slip-resistance, the size and color of the grout joints, the thickness of the tile, height variations from room to room, size of the tile, suitability of the subfloor, and cleaning of the tile.

If your interested in getting a Free Estimate Please Contact Us.
.
.
.

Thursday, January 21, 2010

Tile Setter’s Advice....

For Florida Bathroom Floor Tiles….

Selecting tile for your Florida bathroom is an area where I feel you should adhere to some basic principals. But, this is also an area where you can let your imagination shine. Various sizes, colors, and textures combined can make your bathroom truly a work of art!

Let’s begin.

* First, you should consider maintenance and ease of such.
* Second, you should consider texture and where to place it.
* Third, colors.
* Fourth, design and design elements consistent with the interior flavor or theme of your home or space.
* Maintenance is often overlooked at the expense of loss of luster and shine over a period of time. Nothing looks worse than a dull and well worn Travertine.

My advice after having busting out many Travertine floors is to consider Granite, Ceramic, Porcelain, or Glass for the bathroom floor. Use a durable non porous easy to clean material. You can use Travertine but remember it needs to be sealed. As a floor surface this can build up if not maintained properly. Like Marble, Travertine is a soft material and requires maintenance and can be stained, scratched, and easily chipped.

Textures on the floors can add an immediate design element. Perhaps a textured material or natural stone placed strategically in the center of the floor or as a perimeter band. Running your floor tile on a diagonal or diamond pattern has the effect of making your room look larger. However, expect to pay anywhere from $1.00-2.00 extra and more for a diagonal diamond pattern per square foot.

Design elements will add to cost as well. As much as $5.00 or more per square foot can be expected. Textures such as tumbled Marble would best be suited on walls. Round Riverbed Stones work well on shower floors and offer somewhat of a therapeutic value. Tumbled Marble or another color of Natural Stone used as a color band if incorporated correctly adds excitement and an “out of the ordinary” point of interest.

Colors. Always remember when using Natural Stone the installation generally costs more because tile setters have to craft, shape, grind, polish and form many pieces of the material. More often than not, there are no pre-formed corners and edges as there are with ceramic tile. And, the process takes a lot more time. You’ll appreciate that more when shelling out more per square foot for the material alone.

Another point to remember is that almost any tile including Natural Stone can have a pattern! You really need to open up a few boxes to determine if you may run into an issue here.For instance, some time ago we installed a Walnut Travertine shower and walls. As I removed tile from the boxes and it was placed on the wall, we could clearly see we had reassembled the cut slab straight out of the box. This is unusual but it happens. In other cases the same grain or flow of colors in Natural Stone be it Granite, Marble, Sandstone, Travertine, and Gemstone may not look good. Dark tile areas might need to be distributed within lighter tiles so you don’t wind up with too many dark or light tiles in one area.

If you are a DIY’er, when setting Travertine floors or walls be sure to use a thinset mortar that closely matches the tile surface color. Lighter Travertine should be placed with white thinset mortar and darker or chocolate Travertine should be set with gray thinset mortar. This is because Travertine is a porous material and your thinset can actually show through the surface or push through on installation. This can appear as a stain.

Design elements enhance the flavor of a space by using colors, textures, and sizes. A simple 6X6 shower enclosure will look much more appealing with a color stripe at the very least at about eye level. Using that same color stripe in other spots like the shower floor or inside a niche adds a little class.

There is a virtual universe of materials, colors, and textures at local distributors to flavor your next project. These additions add simple and attractive sophistication to an otherwise boring bathroom floor or shower.

The materials and ideas are as endless as your imagination and budget.

Be creative !

Friday, December 4, 2009

Tile to Tile Transition....

Often here in Florida when doing a new tile installation we come across
other rooms that already have tile in them that we need to tile up to.
Usually a carpet or laminate area that the homeowner wants to remove and have new tile installed and the new tile we are installing will run into another tiled room (ie: kitchen, bath, hall bath, laundry, etc.).

So my common practice is to direct the customer/home owner to let me install an "Indian Blanket" cut tile pattern to divide those two tiled area's up to really define each area. Also if by chance the grout joints almost align it would look like a failed attempt to line up one tiled area to another new tiled area. Thus this method will break up the direct grout lines.

You could cut the corners off a field tile and install the diamonds side by side, use a few strips of 2x2 mosaic or even a deco tile. This can also be used when two types of tile run into each other in an open area like when trying to divide a straight laid tiled room into a diagonal tiled room.

Here is a recent one we did where the homeowner wanted us to remove the carpet throughout the home and old tile in the front foyer and install a new 20x20 Porcelain tile in their town house/condo at the beach in Tarpon Springs, Florida. They wanted to leave the kitchen tile since it was new and they liked it.

Here are few other examples of "Indian Blanket" door patterns.

.....Example 1.........Example 2.........Example 4........Example 5


www.ceramictec.com
.
.

Friday, November 20, 2009

Importance of Waterproofing a Shower....

Being a Professional Tile Contractor/Installer in Tampa, Florida and helping out on tile help forums I have noticed people are always asking about info on damaged showers and tubs for water damage, rot, grout discoloration, efflorescence, leaks or black mold.

The lack of a pan liner or surface membrane is usually the main reason these problems occur. Professional tile contractors who know the importance of a properly built shower with a pan liner & pre-slope, a bonded waterproofing sheet membrane or a liquid applied membrane.

Mold and rot occur when water gets absorbed into the grout and then seeps into the cementboard or drywall and then starts rotting the studs. Also when drywall is used the problems are even worse because the mold feeds on the paper face of the drywall. Mold loves cellulose and spreads throughout the damp wet area behind your wall.
As the leak goes unnoticed the damage and mold become worse.

When a shower liner is used without a pre-slope the water sits in the mud pan and slowly deteriorates/breaks down the mud bed and fills with mold/sludge. Sometimes the weep holes then become clogged with calcium deposits and efflorescence forms on the grout joints from the water drying up through the grout to the surface. A bonded surface membrane will solve these problems.

While we still do and have been doing traditional pan liners for as long back as I have been doing tile for (21 years), newer, updated ways of waterproofing a shower have been developed like Schluter Kerdi, Noble TS, Laticrete HydroBan Laticrete Hydro Barrier & Custom Building Products Redgard.
All excellent surface applied waterproofing membranes.

I tell customers it's good to spend the extra money now to do it right or you will spend 3 times the money tearing it out a few years later by doing it wrong.

Friday, October 30, 2009

Tile Selection in Florida......

Ceramic, Porcelain, Marble or Stone?

The selection of tile is almost limitless, especially here in Florida where there are so many domestic and imported tile from around the world shipped here.
Many homeowners are taking the selection of their tile more seriously than ever before. The old traditional look of 4x4 or 6x6 ceramics on the walls and floors is falling to the wayside as consumers look for the perfect tile for their projects.

Then, of course, comes the question: What is the best choice?
Tiles come in a wide variety of materials including clay, porcelain, and even glass among other choices. The durability of tile is graded in hardness. The more dense the tile, the harder the finished surface is. Porcelain, for instance, is the best tile in terms of density and hardness. Porcelain tile has color all the way through the tile versus screen print or glazed tiles, which are basically painted only on the surface. Porcelain will lasts longer with fewer problems with wear. Porcelain is also preferred for outside installations because it is more frost resistant.

Marble and stone are in a class all by themselves. Natural stone tile require more care in selection and maintenance. Installation of these materials is more labor intensive requiring a greater degree of skill and know-how to install them. Prices for stone materials are typically higher than ceramic or porcelain tiles and installation costs reflect the degree of difficulty to install them. Stone tile bring nature into your Florida home. They add a feeling of luxury and permanency. Granite counter tops in kitchens and baths combined with a tumbled marble backs plash make for a classy look and feel to any Florida home.

The tile you select for your project is just as important as the installer. Leave some money in your budget for a quality tile job. Once installed, tile can't be changed as easily as your paint color. Consider all the options and textures for tile and plan to spend a day or two looking at several different distributors. Be careful of discount tile, as it is sometimes inferior in quality and ultimately will make for a bad tile job. Remember, you get what you pay for. Don't skimp on your tile project. It will costs much more down the road to repair or replace your tile if done incorrectly and cheap.
Tampa Bay ,Lutz ,Oldsmar ,Apollo Beach, Ybor City, Gibsonton, Carrollwood, Northdale, Lake Magdalene, Palm River-Clair Mel, Progress Village, Riverview, Temple Terrace, University, Westchase, Wesley Chapel, Hillsborough County,
...............Ceramic..........................Porcelain................Marble/Natural Stone

Apollo Beach, Bloomingdale, Boyette, Brandon, Cheval, Citrus Park, Dover, East Lake-Orient Park, Egypt Lake-Leto, Fish Hawk, Gibsonton, Greater Carrollwood, Greater Northdale, Greater Sun Center, Keystone, Lake Magdalene, Lutz, Mango, Palm River-Clair Mel, Pebble Creek, Plant City, Lakeland, St. Pete, Progress Village, Riverview, Ruskin, Seffner, Tampa, Temple Terrace, Thonotosassa, University, Valrico, Westchase, Wimauma, TAMPA FL